We have many systems and a myriad of companies we work with. Below are documents that offer guidelines for working with our different systems.
How to submit an application to Nusenda
Lender and Bank Detail Info
We work with multiple lenders and each has their own requirement. Ofelia did a great job putting together this spreadsheet the outlines their qualifications and requirements.
Adders, Rebates, & Promos, HDM, Solar Insure

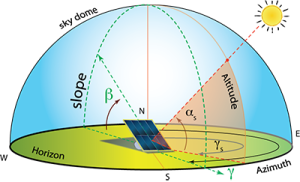
Slide Deck put together by Jim Schwarzbach for Sales