Category: Solar Track

What’s a set-back?

What’s a set-back?

A set-back is the area around the panels where fire fighters and other service personnel can get around the solar arrays that are installed on our roofs. In many areas, these no-build zones have traditionally been called “fire set-backs.”

Set-back defaults

The default widths are set by the fire and building codes in your area but for the most part, here are some common guidelines for our area.

The Ridge, Valleys and Hips
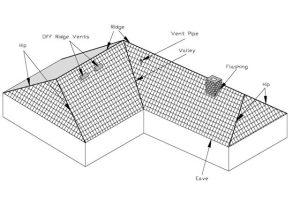
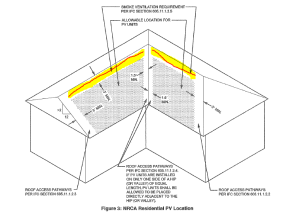
The ridge is the top-most or peak line of the roof. Valleys are the dips (lows) between adjoining mounting planes and the hips are the ridge lines (highs) between two sloping mounting plans.

The set-backs for these areas are 1.5 feet or 18 inches. If solar panels are mounted on adjoining areas (as in ridges, hips and valleys), there will be a 3 feet margin between them, which gives fire workers enough room to move between the arrays.

Gabled Roofs
Gabled roofs have mounting planes that are perfect rectangles. These types of roofs have a 3 foot set-back at the outer edge in addition to the 18 inches on the ridge line.

Gutters and Eaves
Whether you have a gabled or other type of pitched roof, the lower edge (known as an eave or gutter) has a 0 inch set-back. This means that solar arrays can be installed up to the lower edge of the roof.

Flat Roofs
These types of roofs are very common here in the borderland. They too have set-back requirements. The perimeter edges of most mounting planes on a flat roof have low walls called parapets. All parapet walls require a 3 foot fire set-back. This means that the solar arrays cannot be any closer than 3 feet from the inside edge of all parapet walls.
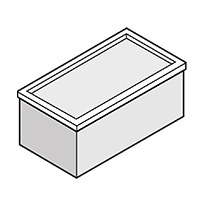
Basic Parapet Wall and Roof Design

Designing your Solar System Using Set-backs

When setting up your set-backs for your designs, you want to lay out your panels and complete your initial design settings first. Once your initial layout is done (whether it is a pitched roof or a flat roof), you will then set up your set-backs.

Pitched Roofs
Select the Set-backs button on the left of your design.
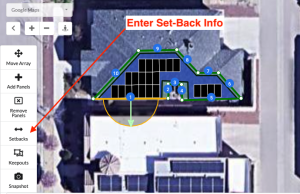
Pitched Roof Set-backs Set-up

Enter the set-back values for each of the edges (in feet).

Gutters or Eaves (0)
Ridge (1.5)
Valleys and Hips (1.5)
Gable Roof Outter Edge or Straight Edges (3)
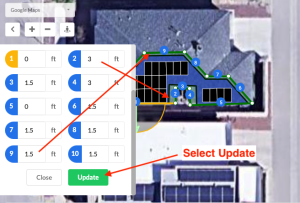
Pitched Roof Set-back Numbers

Select the Update, then Close buttons. Your design will update. At this point you can edit (add or remove panels) and do any fine-tuning you need to. Select the Calculate Button on the left and proceed to your Quote.

Flat Parapet Wall Roofs
Select the Set-backs button on the left of your design.
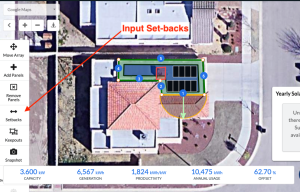
Flat Roof Set-back Set-up

Enter the set-back values for each of the edges (in feet).

Set ALL Parapet Wall Edges (3)
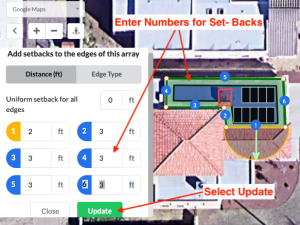
Flat Roof Set-back Numbers

Select the Update, then Close buttons. Your design will update. At this point you can edit (add or remove panels) and do any fine-tuning you need to. Select the Calculate Button on the left and proceed to your Quote.

Azimuth and Pitch (tilt)

Azimuth and Pitch (tilt)

Why is the orientation of panels so important?

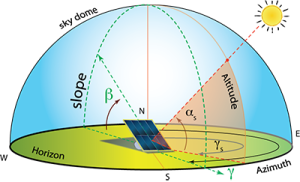
The amount of sunshine a panel receives depends on a number of factors. Panels facing due south receive the most sunshine since the sun is hitting them all day long. Panels facing due east will receive morning sun, but by the mid-afternoon the panels are on the shady side of the house. Conversely, panels facing due west don’t start receiving sunshine until the sun has passed over the mid-morning spot and the sun starts hitting them.

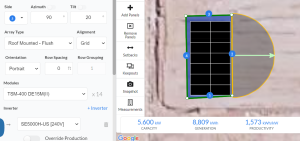
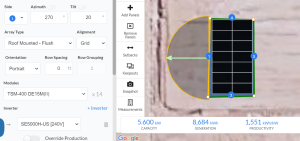
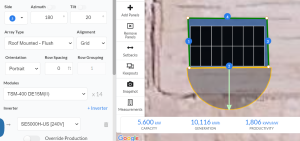
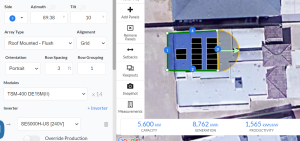
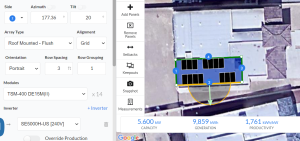
Below we can see an example of a 5.6 KW system, with the panels at a 20 degree pitch. They will produce 8,684 kWh annually if the panels face due west. The same 5.6 KW system facing due east will produce 8,809 kWh over the course of a year. If the panels are facing due south, then our 5.6 KW system will produce 10,116 kWh – about 16% more per year than the west facing panels!

(Click on the images to enlarge them.)

East at 20 Degree Pitch


West at 20 Degree Pitch


South at 20 Degree Pitch


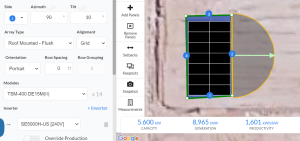
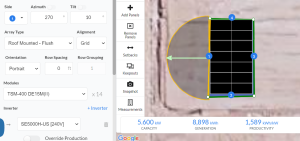
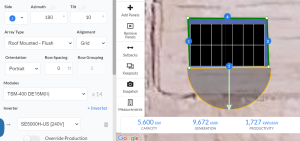
In addition to the azimuth, another production variable is a panel’s tilt (sometimes called pitch). Notice that the east facing system at a 10-degree pitch produces 156 more kWh annually (8,965 vs 8,809) than a system on a roof with a 20-degree tilt. The west facing system with a 10 degree tilt gives us 8,898 kWh, 214 kWh more each year than the west facing system that produces 8,684 kWh. Look at what happens with the south facing panels when the tilt is changed from 20 degrees to 10 degrees. Unlike east and west facing panels that get more annual production at 10 than 20, south facing panels produce 444 fewer kWh at 10 degrees than they do at 20 degrees, 9,672 vs 10,116. Most of this has to do with angle of the sun at each azimuth and pitch angle to the panels during the course of the year.


East at 10 Degree Pitch


West at 10 Degree Pitch


South at 10 Degree Pitch


Azimuth is more important than pitch and tilt, but both variables come into play when designing a solar system. We don’t have any control over a home’s orientation or over what their roof’s pitch but we can be effective in how we design the system by using the orientation most ideal for their home.

Working with Flat Roof Designs

When Designing for Solar on a Flat Roof, the principles of pitch and azimuth still apply. There are a few differences however.

When placing panels on a flat roof, you have to include a 3 foot setback along each parapet wall. You also want to avoid placing panels over vents and other obstructions. You will also space your rows about 3 feet apart.

East and West Facing Panels

When a mounting plane requires you to place panels in an east or west direction, your best pitch will be at 10 degrees. The production performance is better at a lower pitch when facing the panels in these azimuths.

Flat Roof – East facing

South Facing Panels

The best azimuth for any solar array is south but when you are placing your panels on a flat roof your best pitch will be at 20 degrees. The production performance is ideal at this pitch compared with others.

Flat Roof – South Facing
Scoop 102: Refresh about the basics

Scoop 102: Refresh about the basics

Here is a refresher for everyone regarding the basics of using Scoop, particularly, the Prospecting (LEAD) Scoop.

The Prospecting Scoop is our primary means for entering and managing info about a new prospective customer.  It can also be used for creating a new project for an existing customer.  This would come into play where an already installed customer now wants to add a battery or a mini-split.

Please remember that our processes change and improve over time.  This goes for how the Prospecting Scoop works and looks.  If you have not done so already, please familiarize yourself with the Scoop Training Course on this website.   Much of the content has been changed since the course was originally published but it will still give you a basic understanding of how to use the Prospecting (LEAD) Scoop.  Additional content is available via the Knowledge Base on the Scoop Support Website.  Through both resources and live training with your management team, you will have more than enough info to help you be successful using this powerful project management tool.

A detailed guide in PDF form has been provided to your manager to give you during training. If you do not have it, here is a convenient link to the document.  It will walk you through starting your Scoop and Creating your Solar Design in Sighten.

Prospecting (LEAD) Scoop Workflow Key Points

1 – Scoop Creation

When creating a new Prospecting Scoop (Lead), follow these steps.  In some cases, when leads are assigned to you these steps may have been taken care of for you already.


After you click the “add” button, you will next select the appropriate Scoop template.  Pick the “Prospecting” one.


After this step, you will be asked if you would like to create a project.  Skip the Project Step and click on the Next Button.

2 – Create New Client Site

Now you want to create the Client Site.  Think of this as the customer record.  This record is synced with our Zoho CRM (Customer Relationship Manager).  All related Scoops are attached to its Client Site Record.


Name your client site record. Use the customer’s name by default.


Assign your new client site to whom it belongs to within the hierarchy. This is usually you, the consultant. Search for your name. Skip the step after this where you are asked to add to or create a project.  Just click the “Next” button.


Input Required Client Site Info into the fields outlined in the Client Site wizard that follows. These are the fields for the primary contact info that shows up in the Scoop. Most of these are Global Fields that apply to all the Scoops related to the customer. Only the primary ones show in the Client Site Wizard.


Assign your Scoop to the Client Site Record.  It will be selected by default.  If it is not, simply input the name of the client site in the search field.


Skip Project Creation Step.  The Client Site will be selected by default.  If it is not, simply input the name of the client site in the search field.


Remove the Team Schedule Dates.  It will be selected by default.  We have no need to use this at this point so remove it. Simply click on the the little “x” at the end of the date field.


Add Crew Members.  For this step, you may add your manager or anyone that needs to be kept in the loop about this prospect and project.

3 – Input Relevant Info into the Scoop

The Scoop Form has many sections but right now, you only have to be concerned with the two primary sections. These both MUST be filled out.

Section 1 is the Customer’s/Lead’s info. Fill in all the important info. This includes the customer’s name, email, phone and address.


If available, you will also attach a copy of the electric bill in either of the two fields shown below. If you don’t have one yet, it may be helpful for you to set a task to remind you to do so.

Do not pay attention to the field numbers before the field names.  They can be different based on when this image taken.


Select your product

When you create a new Scoop, Solar (PV) will be set as the Primary Project Product by default. In the case of multiple product sales, you will need to select the Second Product. Answer the question with a “Yes” and a drop-down field will display with the product choices.


Once the product field displays, select the drop-down and put a check mark in all the products you will discuss with the customer. Make sure to select the PV item if you are also selling or proposing PV.


Fill in Section 2 Info: Marketing & Solar Smart Living Contact Info

In most cases, when you create a Scoop or one is assigned to you, most of this will already be filled out. Make it a habit to double-check this info. This section includes your consultant info and referrer information (if applicable). At the very minimum, you will want to make sure the “Consultant Name (dropdown)” shows your name.

This field will connect with Everbright, our Solar Design Platform. When you are ready to create your Solar proposal, this field will make sure the Customer Record in Everbright is assigned to you.


Ready to set up your Solar Design Proposal?

Now that you have filled out all the info in Section 1 and 2, you are ready to create your design proposal. Now before you jump into Sighten, you need to change the Scoop Stage to “Proposal Design.”

Changing to this stage in Scoop will automatically create a Lead Record in Sighten for you. We will not cover the details of creating a Sighten Proposal here. You may review the Sighten Training here on Solar Smart University or review the Training PDF we created with the details of creating a Scoop, Completing your Design Proposal, Contract and Finishing the process in Scoop.


Changing this stage will also create automated actions behind the scenes. A proposal record will be created in our CRM (Currently Zoho CRM) and convert the lead record to a contact record, populated with the correct contact info. Your consultant and manager info is also updated in the Zoho record so we can properly support you in your sales efforts. Here is a short list of some of the automations linked to this contact info:

  • Prospect Follow Up Emails
  • Customer Operations Update Emails
  • Welcome and Follow Up Emails
  • Birthday/Anniversary Emails
  • Review Emails


You Presented the Proposal

Once you have met with the customer (either in person or virtually), you will have obviously gone over the design proposal and your recommendations. Whether you make a sale at that appt or not, you need to change the stage to “Proposal Presented.”

Doing so will update the Proposal Record in Zoho as “Proposal Presented.” If your prospect was the result of a referral in the SSL App, this will also update the referral record and mark it as an “Appointment Completed.” Referrers get $25 for every referral that sits for an appt. If this step is not done, Accounting will not know to pay the referrer their bonus.


You Made a Sale!!! Woohoo! Congrats!!

Once you have made a sale, you will have gone through the steps of running credit, getting a check for down payment, and a signed contract. Now you will want to change the Scoop Stage to “CW” or Closed Won. This will generate an email that will notify management of your sale so they can begin their processes–one of which is helping you get paid your commissions.

Wait!!! Hold your horses!!! Before you change that stage, get those Site Pictures!

Before you change that stage to “CW,” you want to get your site pictures and do your “button-up” with your customer.

Part of this button-up is:

  • Help them download the Solar Smart Living App
  • Get referrals
  • Take your Site Picture
  • Explain next steps and what to expect during the process up to and after installation (if you don’t know what that is, ask your manager)
  • Thank your new customer for becoming a customer of Solar Smart Living

Site Pictures Section: Site Pictures (Site Inspection Review)

Take all necessary pictures of the site. The main ones are:

  • Pictures of the Electric Meter
  • Pictures of the Main Electrical Panel (inside and out)
  • Clear Pictures of Breakers and Main Label on the inside of the panel door
  • Pictures of anything out of the ordinary
  • Pictures of the front of the house, so the install team can recognize it easily
  • Any Important Notes


Each field in the Site Pictures Section includes a “Help” link for further explanation of what the field(s) is for. Many fields in Scoop have a “?” icon next to them. Clicking on the icon will reveal the help text.


Note: You may attach pictures you already took or take and attach them directly into the appropriate fields right from the mobile app on your phone or tablet.


You are almost done! Now change the Stage to “CW”

Now that you have taken your pictures and done your button-up with the customer, you may change your Scoop Stage. You may do this in the car before you leave your customer’s home or when you get back to your home or the office. I would suggest doing it before you leave just in case you forget something.


Reminders are shown for missing fields

If you forget to fill out a required field, you will get a pop up or warning. This will remind you what needs to be done. If you are using a laptop or tablet and are logged into the Scoop Web Portal, you will see more info. On the mobile app, you will get a reminder but it may be a little more difficult to find the fields. They will however, be marked with a red asterisk “*”.


Simply fix / fill out the missing info then change the Stage to CW when you are done.


Using Tasks and Comments in Scoop

Comments and Tasks are a way to communicate with management and members of your team that are assigned to your Scoop. These options are found under the Scoop Activities tab and will help you stay on top of items that need to be done. They also communicate and document what you are working on or details about conversations you have had. By not putting in comments, the Scoop will appear to be untouched. We don’t want leads to go cold so make sure to update your notes on a regular basis.

TIP: Set assign time each day (about 30 minutes to an hour) for follow-ups, update your activities and notes. This will keep you more productive, keep prospects from falling between the cracks and ultimately make you more sales and MONEY.


Comments

You can add a new comment to the Activities Section or to any individual field. Each comment will be recorded in Scoop, notify Crew Members on the Scoop and update the notes in our Zoho CRM.


Completing Tasks

When a Scoop record is created for you or a task is assigned to you, a reminder email will be sent to you. The email should have a button in it that if you click on it, you will be sent straight to the related Scoop.

If you have completed the task, you can mark it complete. If you need to move it to a later date, simply edit the task and change the date. If you need to assign it to another person, you can do that from the Task Editing Screen as well.


Conclusion

We hope this refresher has been helpful to you. If you need additional help, consult with your manager. You may also find more detailed help by enrolling in the Scoop Training Course or reviewing the Scoop/Sighten Training Supplement.